Building your own chicken tractor using readily available cattle panels is a cost-effective, sustainable, and rewarding project. This guide offers step-by-step instructions and a comparison of two distinct designs, empowering you to choose the perfect option for your needs and experience level. Whether you're a seasoned DIYer or a complete beginner, you'll find clear instructions and helpful tips to ensure success. For additional resources on chicken coop supplies, check out this helpful resource.
Two Cattle Panel Chicken Tractor Designs: A Comparative Analysis
This guide presents two popular designs: the "Easy Mover" (lightweight and portable) and the "Fort Knox" (robust and durable). Both offer superior alternatives to commercially available coops, providing a mobile and enriching environment for your chickens. Choosing between them depends on your individual circumstances.
Design 1: The "Easy Mover" – Lightweight and Portable
This design prioritizes portability and ease of construction, making it ideal for smaller yards or those who frequently move their flock. It's the perfect introduction to building your own chicken tractor.
Materials List:
- 2-3 Cattle Panels (16ft each, quantity depends on desired size)
- Heavy-duty wire mesh (hardware cloth recommended for predator protection)
- Strong hinges (2-3 pairs, depending on door design)
- 4 small wheels (all-terrain wheels recommended for uneven surfaces)
- Optional: Scrap wood for a base (improves stability and protects mesh floor)
- Various fasteners (screws, bolts, wire ties, zip ties)
Construction Steps:
- Panel Connection: Connect cattle panels using wire ties or sturdy wire to form the basic structure (rectangular shape is easiest). Leave space for a door.
- Mesh Installation: Attach hardware cloth to the bottom and sides, creating a secure floor and preventing predator access. Secure tightly to avoid sagging.
- Door Construction: Attach hinges to a chosen panel section, creating a functioning door. Ensure the hinges are durable. Consider adding a simple latch.
- Wheel Installation (Optional): Attach wheels to the base for easy movement. A simple wood base enhances stability.
- Final Inspection: Thoroughly inspect all connections and ensure there are no gaps that could allow escape or predator access.
Pros: Easy to build, inexpensive, highly portable. Cons: Less sturdy than Design 2, smaller interior space, limited weight capacity.
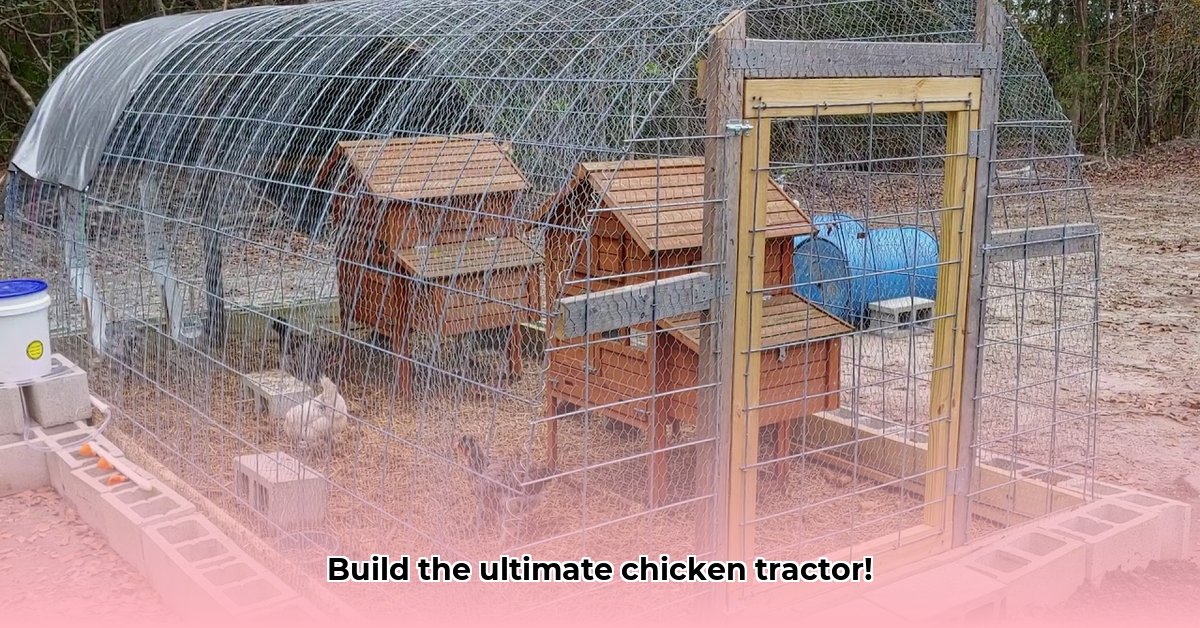
Design 2: The "Fort Knox" – Robust and Secure
This design emphasizes durability and long-term protection, ideal for larger properties or areas with significant predator issues. It provides superior security and longevity.
Materials List:
- 4-6 Cattle Panels (16ft each, quantity determined by desired size and sturdiness)
- Pressure-treated lumber for framing (2x4s and 4x4s recommended for posts)
- Heavy-duty hardware cloth (essential for robust predator protection)
- Heavy-duty hinges and strong latches (consider reinforced options)
- Larger wheels or a solid base (for easy movement, even when fully loaded)
- Various fasteners (screws, bolts, etc.)
Construction Steps:
- Sturdy Base Construction: Build a solid wood frame using 4x4 posts and 2x4s. This forms the foundation for increased stability.
- Panel Attachment: Securely attach cattle panels to the wooden frame. Ensure firm fastening to prevent shifting.
- Predator-Proofing: Cover the entire structure with heavy-duty hardware cloth, creating a seamless barrier to deter predators. Pay close attention to corner and seam integrity.
- Door and Hinge Installation: Install robust hinges and a secure latch on the door section. Strong hinges are crucial for this heavier design.
- Optional Roof Addition: A roof adds additional elements and predator protection.
Pros: Extremely durable, larger interior space, superior predator protection. Cons: More expensive and time-consuming, less portable, requires more advanced carpentry skills.
Choosing the Right Design for Your Needs
The best design depends on individual needs and resources. Consider these factors:
- Yard Size & Mobility: Frequent relocation necessitates a lighter, more portable design.
- Predator Pressure: High predator risk warrants the increased security of Design 2.
- Budget & Time: Design 1 is faster and cheaper; Design 2 is a more significant investment.
- Flock Size: The tractor must accommodate your chickens comfortably, avoiding overcrowding.
Both designs offer substantial advantages over commercial options. Choose wisely and enjoy the process!
Safety and Regulatory Compliance
Prioritize safety throughout the construction process. Regularly inspect for damage or weaknesses. Ensure all fastenings are secure. Consult local regulations regarding animal housing and enclosures before starting your project.
Frequently Asked Questions (FAQs)
Q: What type of hardware cloth is best? A: Hardware cloth with 1/2" or smaller mesh openings provides effective predator protection.
Q: Can I use different types of wood? A: Yes, but pressure-treated lumber is recommended for outdoor durability.
Q: How do I make the tractor predator-proof? A: Use heavy-duty hardware cloth, secure all connections, bury the bottom of the mesh slightly into the ground, and consider adding a roof.
This comprehensive guide empowers you to build your own cattle panel chicken tractor with confidence. Enjoy the fruits of your labor—fresh, homegrown eggs!